
What is Macro Photography?
Macro photography refers to photography taken of small subjects at scales of 1:1 or greater. In macro photography, the reproduced image of the subject on the camera’s sensor or film is typically life-sized or enlarged compared to the actual size of the subject. Most digital and film cameras are not capable of shooting subjects at these close distances and achieving 1:1 or greater magnification without additional macro lenses or extension tubes.
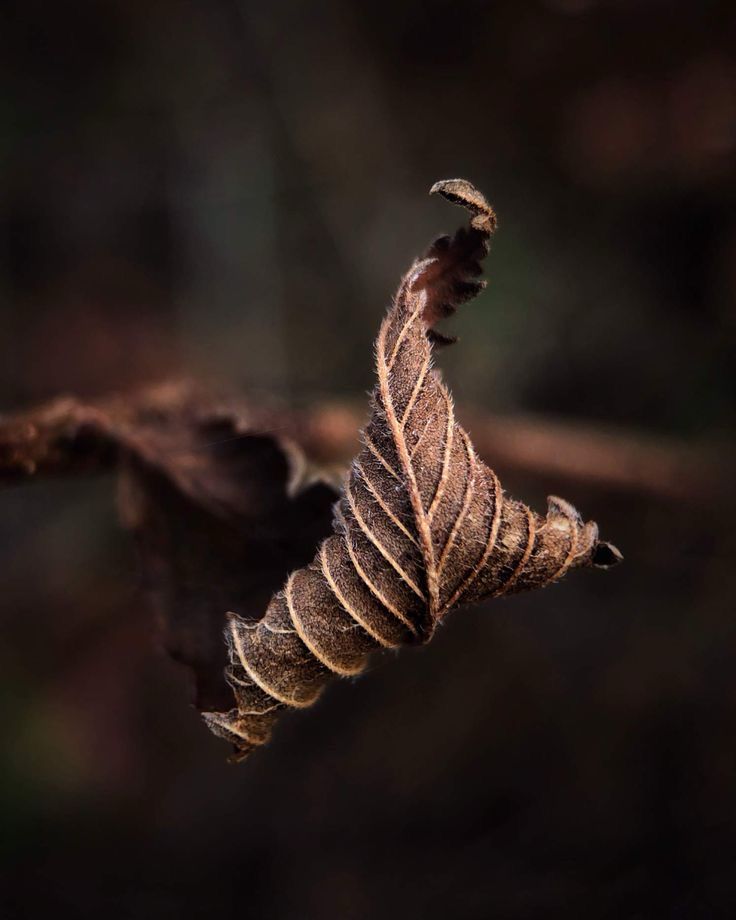
Macro photography allows photographers to capture intricate details and textures of smaller subjects that are invisible to the naked eye. Popular subjects for macro photography include insects, flowers, parts of plants, patterns in nature, coins or stamps. Macro photography requires dedicated macro lenses that offer high magnification ratios to allow subjects to fill the frame when shot quite close up.
Related Post: Food photography Trends


Importance in Photography
With macro capabilities, photographers are able to fill the frame with a subject that is just millimeters in size. This reveals textures, patterns and colors that exist at microscopic scales. Macro photography is important because it focuses attention on the miniature world that surrounds us. Details like dew drops on a spider’s web, the inner workings of a flower or insect anatomy are made visible through the lens of a macro camera.
Macro subject matter shows audiences parts of nature that most people rarely observe up close. It highlights the incredible complexity of form and biology present even in seemingly simple organisms. Macro photography provides a fascinating peek into the small-scale worlds all around us and demonstrates the hidden grandeur that exists on a small scale.
Equipment for Macro Photography
Macro Lens
A macro lens is specifically designed to allow the photographer to achieve life-size or greater reproduction of very small subjects. Most macro lenses have a focal range of around 60-100mm, which allows working distances close to the subject that are appropriate for macro photography. The magnification ratio, expressed as “1:x”, indicates how large the subject appears on the sensor or film.
High-quality macro lenses will offer ratios of 1:1 or higher, reproducing the subject exactly life-size or enlarged. Popular macro lens brands include Nikon 105mm f/2.8, Canon EF 100mm f/2.8 Macro IS USM, and Sigma 105mm f/2.8 EX DG OS HSM. For attachable lenses on phones or smaller system cameras, affordable options include macro lens attachments and close-up filters that screw onto existing lenses to add macro capabilities with magnification around 1:3.
Read More: Macro Photography Essential Equipment
Extension Tubes
Extension tubes are hollow tubes that fit between a camera body and an existing lens. They physically extend the lens further away from the sensor, allowing it to focus closer than normal minimum focusing distance. This increases the lens’ magnification ratio, enabling macro shooting without a dedicated macro lens. Extension tubes are affordable and can turn virtually any lens into a “macro.” Their advantage is added magnification without glass elements that could affect image quality.
However, extension tubes have limitations – they don’t allow autofocus, so focusing must be manual. Additionally, image quality may soften more than macro lenses due to increased light fall-off at the edges of the frame from greater magnification. Extension distances are also limited, topping out at lower ratios than dedicated macro lenses. Extension tubes are still an economical way for photographers to experiment with macro shooting using existing lenses. But for serious macro work, a true macro lens offers better controls, strengths and reproducible quality.
Extension tube options that are compatible with many camera systems:
- Kenko DG Extension Tube Set – Available in 12mm, 20mm, and 36mm sizes, this set is compatible with Canon EF/EF-S and most Nikon F mount lenses.
- Canon Extension Tube EF 12 II/EF 25 II – Made for Canon EF/EF-S lenses, lightweight tube extenders in 12mm and 25mm sizes.
- Fotodiox Pro Extension Tubes – Come in 12mm, 20mm, and 36mm sizes and work with Canon EF, Nikon F, Pentax K, Sony A and Four Thirds mounts.
- Sigma ET-72 Extension Tube – Compatible with SIGMA SA bayonet mount including Sigma, Pentax, Sony A, and Four Thirds lens mounts.
- Olympus M.Zuiko Digital MC-14 Teleconverter/Extension Tube – Designed for Micro Four Thirds mount lenses, offering 14mm of extension.
Techniques and Tips for Macro Photography
When choosing subjects for macro photography, look for things that have interesting textures, patterns or intricate details that can be revealed up close. Common macro subjects include insects and spiders, flowers and plant life, beads and jewelries, frozen water droplets, and textures found in food. Insects like dragonflies, grasshoppers and butterflies make colorful macro targets if they hold still.
Examine everyday objects microscopically—coins, fabric, trash found on the beach can look abstractly beautiful at 1:1 scale. Shooting macros of items in your home can inspire new perspectives. Experiment with lighting to emphasize features like fuzzy pollen clusters or the honeycomb structure inside a blossom. Macro photography is about discovering miniature worlds hidden all around us.
Butterfly Photography in Dubai
Composition For Macro Photography
Composition is especially important for macro shots, where the tiniest elements dominate the frame. Use classic techniques like the rule of thirds to create a sense of balance and visual flow. Look for frames within frames by zooming in on just a section rather than capturing the whole insect or flower. Leading lines created by an insect’s legs or the curve of a petal can guide the viewer’s eye through the photo.
Pay careful attention to what will be in focus, as depth of field is very shallow at macro distances. Select backgrounds that smoothly blur away from your subject rather than distracting or overshadowing it. Isolate your subject by placing it off-center rather than in the middle. Experiment with elevated or ground-level angles to find a fresh perspective. Make use of natural or side lighting to highlight textures. With macros, precise composition and control over sharpness in the frame are key to creating images that intrigue viewers and draw them into the small worlds revealed.
Lighting For Macro Photography
Proper lighting is crucial for macro photography to bring out textures and details. Natural light next to a window is ideal, though shade or diffused sunlight works best to avoid harsh shadows. A macro flash or twin flash system offers reliable lighting and the ability to diffuse, bounce or direct light exactly where needed. Reflectors can bounce light back into shaded areas.
An on-camera flash or portable flash can provide fill lighting outdoors but watch for shadows. Some photographers use light boxes or a setup with flash above and below the subject to light evenly. A macro ring flash attaches around the lens for balanced illumination. During post-processing, dodging and burning helps draw attention to focal points. By choosing the light source and positioning carefully, you can control contrasts, highlight colors and illuminate all the nooks and crannies in the miniature scenes that macro photography reveals.
Depth of Field
In macro photography, depth of field is extremely shallow even at the smallest apertures. Only a sliver of the subject will be sharply focused, requiring precise focus placement. Manipulating depth of field is an artistic tool. Stopping down the aperture increases depth of field but slower shutter speeds risk blur from movement. Focus stacking combines multiple shots at different focus points to increase the zone of sharp focus. Wider apertures isolate subjects with dramatic out-of-focus backgrounds.
Changing your shooting distance and focusing closer or further affects depth of field. Understanding how aperture, focus distance and magnification impact sharpness allows creative control. By adjusting these factors, macros can highlight intimate details or the subject’s environment for context, elevating simple snapshots into vivid microscopic portraits.
Overcoming Challenges in Macro Photography
| Overcoming Challenges in Macro Photography | Solutions |
|---|---|
| Depth of Field | – Use a smaller aperture (higher f-stop) to increase depth of field. |
| – Experiment with focus stacking techniques to merge multiple images with different focus points for a sharp, extended depth of field. | |
| – Be mindful of diffraction, choosing an optimal aperture that balances depth of field and diffraction effects. | |
| Focusing | – Employ manual focus for precise control, especially in situations where autofocus may struggle. |
| – Explore focus stacking to combine images taken at different focal points, resulting in a fully focused and sharp macro photograph. | |
| – Utilize focus bracketing to capture a series of images with slight focus variations, providing more options for sharp final results. | |
| Environmental Factors | – Plan macro shoots during periods of minimal wind to reduce subject and camera movement. |
| – Consider shooting early in the morning when temperatures are cooler and humidity is often higher, minimizing environmental challenges. | |
| – Use diffusers or reflectors to control harsh lighting conditions caused by direct sunlight and mitigate the impact of wind. |
Post-Processing Techniques for Macro Photography
Popular photo editing software like Adobe Photoshop and Lightroom are excellent for macro post-processing. They offer specialized tools for detail enhancement, noise reduction and color tuning. Noise reduction is especially important for high-ISO macros, and programs include luminance and color noise sliders for targeted correction. Sharpening brings micro textures to life but can also create artifacts – use masked sharpening applied selectively to protect smooth areas. Content-aware filling replaces distractions like dust or spots.
Split toning or toning curves can add warmth or vibrancy while color saturation can Amp details. Focus stacking macros combine clarity across the subject’s depth. Spot removal tidies blemishes without pixelation. Careful, conservative application preserves naturalness versus over-processed looks. Macros respond well to advanced controls with potential to transform snapshots into gallery-quality artistic prints.
color correction methods that can be useful for macro photography
- White balance adjustment – If the white balance is off, colors may look incorrect. Adjusting the white balance slider can correct the overall color cast.
- Temperature and tint sliders – Fine-tuning the temperature (warm-cool) and tint (green-magenta) can achieve more accurate skin tones and whites.
- HSL/Hue-Saturation-Luminance sliders – Adjusting individual color hues, saturations and luminance values can correct colors that got shifted, like reds appearing too pink.
- Color mixers – Tools like Color Range in Photoshop let you isolate and adjust specific colors, like deepening a flower’s red tones without altering greens.
- Split toning – Applying different warm/cool colors to highlights and shadows can give a unique vintage or artistic look while preserving realism.
- Masking – Using selective masks lets color corrections be applied only where needed, avoiding over-processing the whole image.
- Color blend modes – Overlay or Hard Light blend modes in adjustment layers can subtly enhance colors without blowing them out.
Macro photography opens up a whole new world of discovery. By getting up close to capture intricate details and textures, we find beauty even in tiny subjects that were once invisible to our eyes. This guide provided an overview of the core techniques photographers use to excell at macro – from choosing optimal lenses and accessories, to mastering composition, lighting, post-processing and more.
While technical skills are important, the true reward of macro lies in learning to see the world from a new perspective. I hope this introduction has inspired readers to experiment with magnification and find their own inner macro photographer. There is no limit to the wonders awaiting us under close examination. I wish all enthusiasts the very best in their microscopic adventures to come. Now get out there, peer even deeper, and let your pictures share all the miniature marvels you uncover along the way.