
Table of Contents
Macro photography allows photographers to capture incredibly detailed close-up shots of small subjects and miniature worlds invisible to the naked eye. Mastering macro photography tips and techniques requires both specialized equipment and the steady hand of a skilled photographer. Beyond simply getting near your subject, successful macro shots depend on carefully controlling lighting, depth of field, and focusing precision at extremely close focusing distances. For photographers looking to diversify their portfolio or discover a new type of photogenic subject matter, taking the time to learn macro techniques opens up an entire universe ready for artistic exploration and stunning photographic results.
Understanding Your Gear
The first step to successful macro photography is understanding your camera body and lenses. Most digital cameras can macro focus to some degree, allowing close-up shooting, but true macro capabilities require dedicated macro lenses or accessories. Research your camera body’s specifications to determine its minimum focus distance. Macro lenses allow 1:1 reproduction ratios, meaning subjects can be captured life-size on the sensor. Popular options include macro lenses from Nikon, Canon, and Sigma in the 60-100mm range.
| Focal Length Range | Suitable For | Additional Notes |
|---|---|---|
| 50-60mm | General macro photography work | – |
| 90-105mm | Popular choice, lens-to-subject distance matters | Look for image stabilization |
| 100mm | Greater subject-to-lens distance | Higher price |
| 150-200mm | Stalking flighty subjects, more distance from scary or skittish subjects | Most expensive range |
| 40mm | Close-up work with small subjects | Compact size |
| 180mm | Close-up work with subjects requiring more distance | Excellent for insects, flowers |
| 200mm | Close-up work with subjects requiring more distance | Offers extra reach, ideal for small creatures |
Extension tubes mount between the camera body and lens, allowing non-macro lenses to focus closer. Close-up filters simply screw onto existing lenses. Test which gear delivers best results on your camera. With any macro setup, pre-focus your shots using live view or your camera’s focus limiter. Also familiarize yourself with settings like aperture priority for controlling depth of field, high ISOs for sharp handheld shots, mirror lock-up to reduce vibration, and image stabilization if available to maximize sharpness at the macro levels needed.
Related Post: Macro Photography Equipment

Enjoy
20% Off
Book Vibeztudio Photography Dubai and enjoy a 20% discount on your booking on all photography and videography services in Dubai. Offer runs till 09/05/2024.
Finding the Right Subject
When venturing out with your macro gear, train your eye to see beauty in small details often overlooked. Examine plant life, insects, water surfaces—anything that could reveal an interesting texture, pattern, or miniature world under magnification. Get up close and explore various subjects to discover appealing colors, forms, or intriguing compositions in shapes and lines. Experiment capturing dewdrops, frost or raindrops on foliage which can become light-refracting prisms.
Consider where your subject is located and the natural lighting conditions. Backlit subjects like spider webs or the inner workings of flowers showcase ethereal silhouettes and heightened tones. Morning’s and evenings provide soft, directional light ideal for revealing textures. Pay attention to seasonal changes too, as subjects like blossoms or mushrooms are transient macro wonders. Research what thrives in your specific ecosystem all year for photo opportunities wherever you are. With some observation, anywhere has potential for arresting macro photographs that turn everyday items into otherworldly works of art.
Mastering Depth of Field In Macro Photography
One of the biggest challenges in macro photography is mastering very shallow depth of field, where even the thinnest slice is captured sharply. At macro distances, the smallest aperture adjustments alter what falls in and out of focus. In most cases, use a high f-stop number between f/8-f/16 to increase depth of field so more of the subject is recognizably sharp. This requires utilizing ISO speeds capable of compensating for less light entering the lens.

Focus stacking overcomes shallow focus by capturing multiple images at different points of focus and combining them digitally. Specialized focus stacking software such as Helicon Focus assembles photographs into a final image with a greater apparent depth of field than any individual shot. Proper focus stacking requires properly bracketing shots with only minor focus shifts between each and careful attention to consistency in lighting, positioning, and camera settings. The process takes more time but produces stunningly sharp macro photographs showing intricate subject details from front to back.
Here are some tips for achieving consistent lighting when focus stacking in macro photography:
- Use a light tent, photo lightbox, or homemade diffuser to help eliminate shadows and produce soft, even illumination across the subject. This ensures brightness remains consistent across images.
- Stabilize your camera on a tripod and prevent any shifts in light direction between shots. Even subtle changes can ruin an autofocus stack.
- Shoot early or late in the day when natural light is softer and won’t fluctuate as much as midday sun. Supplement through-the-lens flash may be needed for faster stacks.
- Enable mirror lock-up mode to reduce vibrations that could shift lighting perceptibly between exposures. Consider a shutter release cable for maximum stability.
- Set your camera to aperture priority mode and lock the aperture/exposure for each shot. Manually focus between frames if possible to avoid autofocus adjusting exposure.
- For handheld stacks in low light, use fast shutter speeds to freeze movement and small aperture adjustments between shots to maintain exposure parity.
- Check focus stacking software allows exposure compensation between LDR images for any variances and aligns layers seamlessly.
Controlling Light
The most important factor in achieving Excellent macro shots is having the right lighting. When possible, natural daylight provides soft, flattering illumination. Overcast skies or open shade diffuse harsh shadows. Reflectors can also bounce light into areas of darkness. For portable macro setups indoors, consider ring flashes to surround the lens with uniform light that doesn’t obscure the view. Better macro flashes have sliding panels to dim parts of the light to highlight edges. LED panels like the Flashpoint Ringlight offer customizable lighting for still life or product work.

Play with angling lights to enhance textures, create dramatic shadows, or emphasize certain features. Front lighting can cause unwanted reflections; side or backlighting often yields more depth and interest. Learn how the position of light sources influences focus on and affects separation from backgrounds. With macro photography, even subtle lighting tweaks make big impact on the look and feel of close-up images.
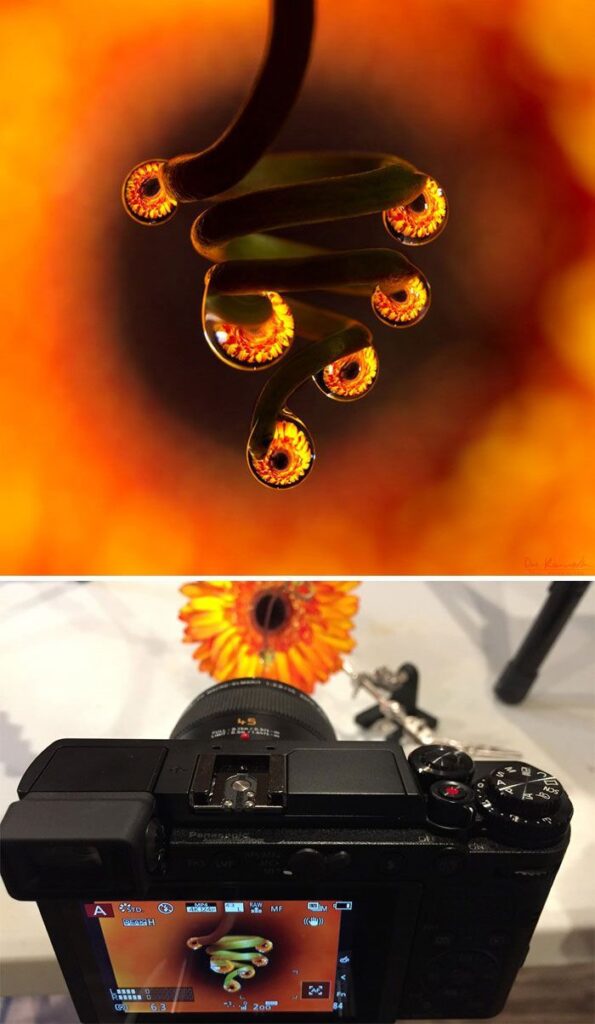
Macro Photography Tips and Techniques : Raindrops

Capturing raindrops offers photographers a unique macro challenge full of beautiful textures and translucent colors. Look for raindrops resting on flat surfaces like leaves, tree bark, or car windows where they will maintain their shape for clear images. On a rainy day, scout locations near you with overhead shelter where you can set up your tripod close to the action.
After rainfall is an excellent time to search for macro photography subjects. The presence of droplets can have a spellbinding effect on an image.
A 50mm macro lens at f/11-16 is ideal to capture the whole drop in focus. Position your camera directly above or below drops for photos that accentuate their curvature. Experiment with backlighting from a flash or ambient sidelight through the drops. Use faster shutter speeds like 1/250th-1/500th sec to sharply freeze the droplets in place. Focus carefully on the drop’s outer surface for ultra sharp results. Consider shooting a series of raindrop photos from different angles to showcase their intricate geometries changed by varying light. With care and the right conditions, raindrops make captivating abstract macro subjects.
Achieving Sharpness in Macro Photography
Detail and clarity are especially paramount in macro photography where viewers can scrutinize magnified elements. Nail the focus on the most prominent part of the subject that captures its essence, whether eyes of an insect or crown of a flower, rather than trying to achieve total depth of field sharpness across the whole plane. Use manual focusing and live view for pixel-level control over where precise focus lands.
Slowly turn the focus ring while continually checking your subject until perfectly sharp. This is more accurate than auto-focus at macro distances. Employ any means necessary to create a stable platform free of vibrations, whether a dedicated tripod, mono/tripod, or image stabilization. Even the slightest camera shake can ruin pin-sharp close-up exposures. Use accessories like a remote or timer to avoid touch disturbances. With careful focus and proper support tools, stunningly sharp macro images emerge.
Must Have Macro photography Gear
Paying Attention to Backgrounds
For arresting macro shots, the background plays a supporting role to the main attraction. Use a wide aperture no greater than f/2.8 to render backgrounds pleasingly blurred so as not to compete with or disguise the subject. This draws viewer focus right where you want it. Get close enough that only the subject remains in sharp focus while surroundings melt away.
Add different coloured backgrounds to macro photography shots to change the look of the subject.
For wallflowers or insects near foliage, selective focus emphasizes the macro object. Experiment positioning subjects in front of various background colors and textures like neutral tones, patterned fabrics or natural elements like sand, moss or flower petals. Consider how backgrounds complement and enhance contrast or colors. Avoid situations with complicated environments or those that may confuse the eye. With practice, photographers learn to find backgrounds that frame the subject happily, elevating rather than dragging the artistic impact of close-up shots.
Mistakes to avoid when choosing backgrounds for macro photography
- Overly busy/distracting patterns – Avoid backgrounds with lots of small details, lines/textures that compete with the subject.
- Dark shadows/high contrast areas – These can result in lost detail and prevent the subject from standing out.
- Background is out of focus – Make sure the background is intentionally blurry, not accidentally due to improper focus/aperture.
- Similar colors to the subject – The subject may blend into the background and be difficult to distinguish. Use contrasting colors.
- Unintentional elements in frame – Carefully frame the shot so no stray pieces like branches enter the background space.
- Angle makes orientation unclear – Be aware of placement that obscures whether the subject is upright/level.
- Dirt, debris or imperfections – Inspect backgrounds closely for any flecks that detract from the clean appearance.
- Photographing through objects – Avoid shooting through meshes, fences etc. that can pattern the subject unflatteringly.
Utilizing Composition Techniques

Just as in other genres, strong composition elevates macro images. Apply fundamentals like the rule of thirds by mentally dividing your frame into a 3×3 grid and positioning the subject where lines or spaces intersect for harmonious placement. Shoot from high or low angles, or even lay beneath or within subjects like flowers for immersive viewpoints. Get adventurous with unique perspectives that intrigue the eye rather than standard straight-on views.
With close-up pattern details, ensure they fill the frame completely so that there are no gaps around the edges. Alternatively, you can show the entire pattern with space all around it.
Frame shots so negative space gently leads attention towards the main attractor. Consider whether environmental elements like grass blades or water ripples could guide the viewer’s gaze in an aesthetically pleasing flow. Watch for naturally occurring patterns and lines within the subject’s contours, spots or textures which contribute to formal balance and visual interest. Macro composition requires openness to creative experimentation and showcasing subjects to their best advantage in frame.
Check the LCD screen
When photographing the intricate details visible in macro shots, it’s critical to review images on the camera’s LCD screen. Although using the viewfinder is convenient, the LCD provides higher resolution feedback that is ideal for inspecting critical focus, exposure, lighting, and composition of close-up subjects. Check the LCD after every shot to validate key elements are crystal clear and have rendered as intended. Zoom in to 100% view during focus stacking workflows to confirm each frame is precisely where targeted prior to proceeding.
If your camera has a tilting screen, this can be a great help when shooting small low-down objects as you can tilt your screen up to give a better view, without having to crawl on the ground so much.
Review playback mode between shooting different angles or adjusting lighting to ensure settings are still appropriate. The LCD acts as an important tool for quality control, allowing photographers to refocus, reframe, or adjust camera settings instantly based on image review. Taking time to analyze shots on the larger LCD avoids poorer results requiring additional work later in post-processing.
Make a Standard Zoom Focus Closer by Adding Tubes
For many photographers, stock lenses may not provide close-up capabilities needed for true macro shots. Extension tubes offer an affordable solution by allowing existing lens/camera combinations to focus closer. Extension tubes fit between the camera body and lens, extending the lens’ minimum focus distance without elements that could affect image quality. This pushes the focal plane further back into the lens, reducing the size of the image circle required to cover the sensor but increases magnification.
Common tubes add 12-25mm, bringing the lens closer to subjects. Focusing is limited to longer distances, but magnification increases substantially. For example, a 50mm lens paired with tubes can achieve lifesize 1:1 or higher magnification ratios when focusing a few inches from the subject. Tubes provide extra close-up power on a budget and more creative macro flexibility.
Add a Dioptres to Make a Lens Focus Closer
For photographers wanting even greater magnification potential than extension tubes provide, dioptres offer another inexpensive solution. Dioptres screw directly onto the front of any lens. Made of various plus powered optical glass elements, they function similar to reading glasses by making the lens system focus closer.
Close-up filters are single-element lenses that look like magnifying glasses.
Lower powered +1 to +3 dioptres allow focusing as close as 1-2 feet from the subject. Higher +4 to +10 dioptres enable focusing just inches away, greatly increasing macro capabilities. Using both extension tubes and a dioptre in combination yields impressive close-focus performance from any lens. Some experimentation is needed to find the right dioptre strength based on the lens and desired working distance. Dioptres create vignetting on some lenses but work well as a simple way to take everyday optics to a whole new magnification level. They transform lenses into powerful macro tools.
Patience and Persistence
Capturing nature’s tiny details requires patience and persistence from photographers. Lifestyles, lighting conditions and behavior of small creatures are unpredictable, so spending time observing subjects is often necessary to catch fleeting moments. Take numerous photos of a steady subject from a range of perspectives and using various focal lengths to increase chances of a standout shot. Changing angles may emphasize elements in new visually pleasing ways. Expect to review many images, since macro subjects are dynamic and restless.

Critically analyze your photos – both technical and aesthetic aspects – noting lighting mistakes or uninspiring compositions made so you continue improving. Revisit locations, hoping the conditions come together for that perfect moment. With experience, macro photographers learn to wait calmly as their subjects cooperate, knowing perseverance enhances the likelihood of portfolio-worthy close-ups. While macro demands extra time investment, the subtle beauties revealed make it a highly rewarding genre.
Building a Macro Photography Kit
When starting out in macro photography, focus first on assembling the essential gear needed to capture close-up shots. Invest in a tripod, rated to support your camera setup without shaking or movement. This is crucial for sharp, in-focus macros. A remote shutter release or timer prevents any camera movement during long exposures.
| Accessory | Description | Recommendation |
|---|---|---|
| Macro Lens | Provides high magnification for capturing intricate details of small subjects. | Canon EF 100mm f/2.8L Macro IS USM Lens |
| Extension Tubes | Enables closer focusing distances with existing lenses, increasing magnification. | Fotodiox Extension Tube Set for Canon EOS Cameras |
| Close-up Filters | Attaches to the front of a lens to achieve magnification without the need for a macro lens. | Hoya 77mm Close-up Filter Set |
| Tripod | Provides stability for sharp images, especially in low-light conditions or when using slow shutter speeds. | Manfrotto MT055XPRO3 Aluminum Tripod |
| Remote Shutter Release | Minimizes camera shake by triggering the shutter without touching the camera. | Neewer Wireless Remote Control Shutter Release |
| Reflector | Bounces light onto the subject to fill in shadows and add highlights for more balanced illumination. | Neewer 43-inch Collapsible Multi-Disc Light Reflector |
| Ring Flash | Provides even, shadow-free illumination for macro subjects, especially in close-up photography. | Canon MR-14EX II Macro Ring Lite |
| LED Macro Light | Offers continuous lighting for macro subjects, allowing for precise control over brightness and color. | Neewer Dimmable LED Ring Light |
| Focus Stacking Rail | Allows for precise adjustment of focus points when using the focus stacking technique. | Neewer Pro 4-Way Macro Focusing Focus Rail Slider |
| Macro Photography Book/Guide | Provides valuable insights and tips specific to macro photography, helping improve your skills. | Introduction to Macro Photography |
Learning from Mistakes
Even the most experienced macro photographers encounter failed shots, so don’t get discouraged when things don’t go as planned. Examining what didn’t work provides valuable lessons to avoid similar issues in the future. Analyze poorly exposed or out-of-focus shots – was movement to blame or an incorrect setting? Did your lighting plan need adjustment for the subject’s textures and angles? Make notes to remember insights each mistake revealed.
Every unsuccessful image presents an opportunity to experiment with new techniques. If focus was the problem, try changing your depth of field or focus stacking approach. If motion blur occurred, adjust your shutter speed, use mirror lock-up or a stabilized tripod. Can’t capture elusive subjects? Alter your hiding place, camera positioning or timing of the shot. Difficult lighting? Try different diffusion methods or additional off-camera flashes.
Macro photography throws up daily challenges given how technically demanding the discipline is. With a growth mindset, see errors not as failures but chances to find better methods. Over time, you’ll develop the problem-solving skills to overcome unexpected hurdles, turning what were mistakes into openings for creative exploration. Steady progress comes from learning, not perfection, so embrace each lesson hard-won.
Final Thoughts
Mastering macro photography is a journey that takes continual practice, experimentation and learning from mistakes. But the rewards are immense – gaining an entirely new perspective by seeing the tiny details within our environment that often escape our notice. Through macro shots, we discover hidden natural wonders and gain a deeper appreciation for the miniature world around us.
If the process of building a kit, testing accessories and refining your techniques seems daunting, vibeztudio in Dubai provides expert macro photography services to help you achieve incredible close-up shots professionally. Our experienced macro photographers can help you grab breathtaking abstract macro images of flowers, insects, textures and more. Considering booking vibeztudio for your macro photography needs – we also offer general photography services from headshots to lifestyle photography across Dubai.